Started to work on my MG Infinite Justice after the introduction last Wednesday with some crazy plan for the head sensor unit. ^^
As with some of my other MGs, there are always one or two special parts that I will spend a lot of time and effort on, which for me, are not done for invalid reason. Very much like some of the painting I did on my Gunplas, they are optional work, but I do feel the satisfaction from the effort. I would always like to try out some new stuff for my models - things that I can do with simple items I have. The fun during the process of doing such extra stuff is always more important than completing the model as soon as possible for me.
The head sensor in this particular case, is to realize the details of this component as shown from the box art image.
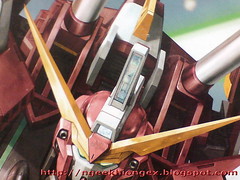
A common design for Athrun's Gundams since Aegis I supposed, ^^ all of his Gundams have very tall/long head sensor units. Because of its overall size, this design allows us to have a look at some of the mechanical details inside this component, as opposed to most other Gundams or MSs that have smaller head sensors, where the details are not exactly visible in 1/100 or smaller scale.
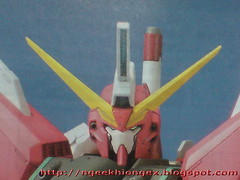
As you can compare from the two images shown above, the illustrated mechanical details from the box art image is much more complicated than the single color painted for the head sensor unit on the completed model shown on the back of the manual. What we are getting for the model kit itself, for straight assembler like me, is a clear part plus foil sticker with no details whatsoever.
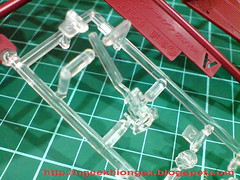
Quite a waste for the clear part to be covered up by the foil sticker just like that in my opinion. The part is small alright, but some effort put into it would allow it to have mechanical details, maybe not as good and realistic as the box art image, but at least better than just a plain foil sticker.
Once decided on that, some thoughts goes into the design of the details ^^
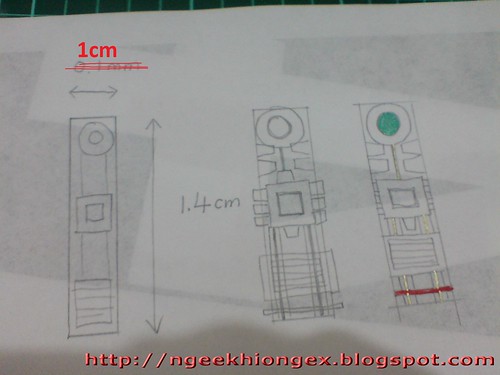
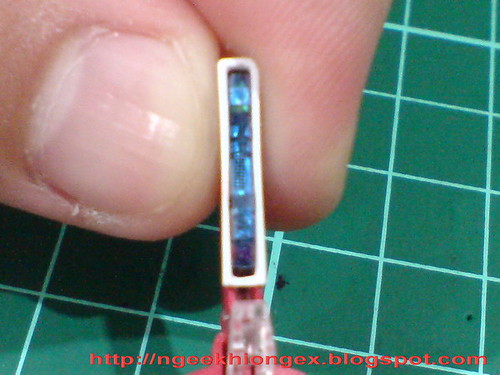
It's 1cm (10mm) for the width of the clear part, not 0.1mm initially written in the sketch above. ^^;
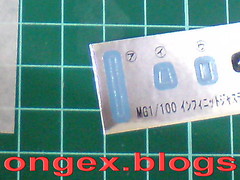
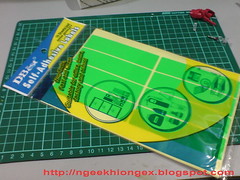
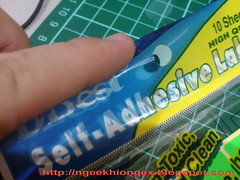
The basic idea is to cut out different foil stickers and paste them onto the clear part to form the details. Foil stickers are very convenient, because I have a lot of them from all the kits I assembled in the past. I believe many others would keep the sheets as well, even though all the required stickers are already used on the actual kit. It's the idea of not wanting to throw away anything related to something you like, that resulted in a whole box of spare polycaps, foil stickers, decals and other unused parts. Now is the time to let them out for some good use I suppose. ^^
Another good quality of foil sticker is that the unused area are all in shiny reflective silver, which means that the tiny details they represent for the sensor unit will be visible even in such a small size.
Apart from the foil sticker, I'm planning to have tiny string on the clear part as well, to emulate the wire connecting the different components on the sensor. The holes for the string to go through on the clear part will be created using pin vise introduced some time ago. The smallest drill bit in my tool kit - 0.3mm will be the hero this time. ^^ A single hole won't be a problem, but I have six points in total planned for the entire clear part. ^^; Six 0.3mm holes on such a small part is going to be a real test of courage and patience I believe XD
Also, another issue: it's not easy to see the state of the work on a clear part. ^^;
Hand drawing is easy, but practical work is not. I looked at the sketch I did and reconsider the design of quite a few parts for the actual work. The flow of the work and the finalized design would look something like this:
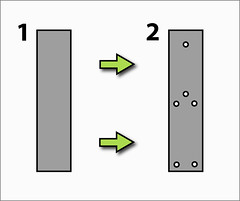
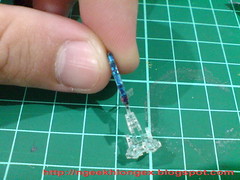
(1 - 3) Drill holes on the clear part first for the strings to go through. The strings are from an ordinary black wire - something like this:
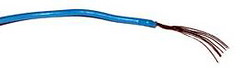
Image is from Antenociti's Workshop (random Google search on "black wire").
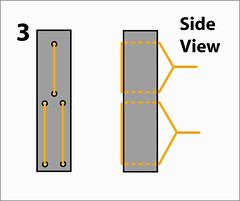
The ends of each string pair are twisted and tied behind the clear part.
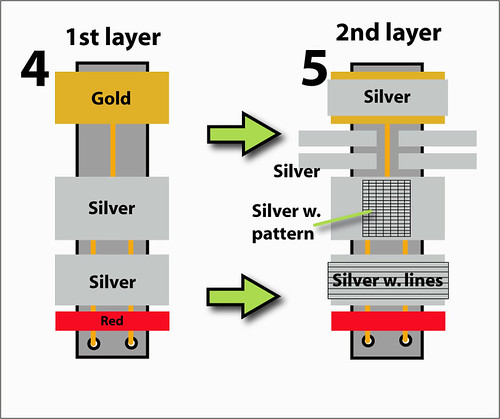
(4 - 5) First and second layers of foil stickers are pasted onto the clear part. No exact measurement actually, since they are just too small to be bothered anyway. The line details on some of them can be created easily by cutting across a sheet of foil sticker lightly.

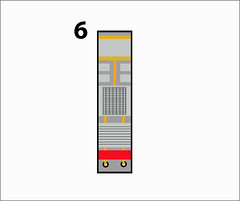
(6) The planned end result. ^^
And the actual end result: ^^

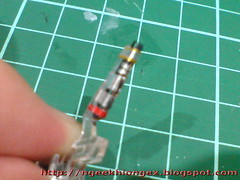
I painted the surface of the clear part in gray using Gundam Marker right after drilling the first hole on it. I just couldn't stand it anymore because the part seriously hard to see ^^;
A comparison:
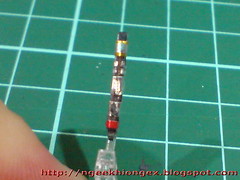
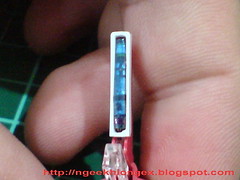
OK I think. The foil stickers stay on the clear part wonderfully, as most of them extend all the way on either side of the part. The work is pretty gut wrenching though, because they are extremely hard to see and paste onto the clear part.
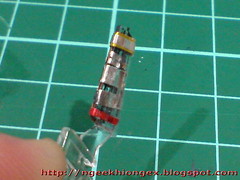
The string didn't work out too well unfortunately, because it's just too small to be noticed. Drilling the six holes on the tiny clear part was quite an awesome experience though. XD
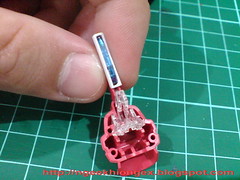
Phase 1 of the work - the clear part itself is done. Moving on to Phase 2 - the two helmet parts that will contain the head sensor.
Because of having so many foil stickers on it (some parts have two layers stacking over each other), the clear part has become thicker, and the helmet parts can no longer accommodate it, which is totally expectable. Given the pinpoint accuracy of Bandai's molding technology, it would be a huge surprise if the "new" clear part can still fit into the helmet without any modification. ^^
The entire work on the helmet parts can be seen below.
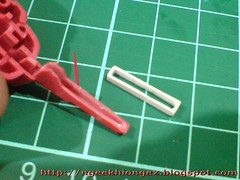
Sand the inner wall of the helmet parts using paper file.
It's done through trial and error where I keep sanding and trying the clear part into it, until it finally fits.
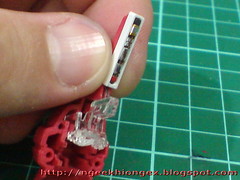
The temporary result. While it can fit into helmet parts, the clear part's depth has increased too much because of the extra sticker, and now it goes out of the entire helmet.
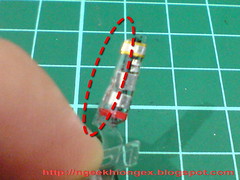
The back portion of the clear part will need to be chopped off.
Just Gunpla nipper will do, but extra caution was taken to not shake off the stickers in front.

A little bit of green sticker was added to the top most portion of the sensor unit for extra details.

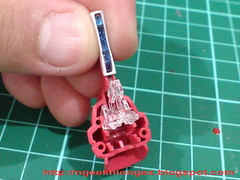
Much better now that everything sits inside the helmet nicely. ^^
Done with the helmet parts, Phase 2 is over, but the entire work is not done yet. Having the extra details is fine, but it's still a sensor unit, where everything must be behind a clear scope, clear blue to be exact in Infinite Justice's case, and that's the next plan. ^^
Took out my paper sticker but it's the clear blue label of the packaging that I'm more interested in for this work. ^^
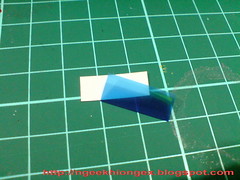
Trying out the clear blue plastic sheet. Just nice. ^^


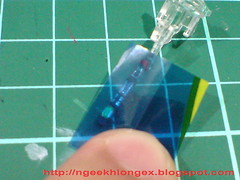
New measurement of the clear part is necessary since the original length and width are no longer useful with all the added stickers on it.
The clear blue piece cut out has to be precise as well, since it's no longer possible to wrap it around the clear part (and increase the thickness and depth again).
Clear paper tape is used on both ends to hold the new "sticker" on top of the clear part.
A little bit more work is needed as the middle section of the sheet is opening up (since it's only held by the paper tape on the top and bottom segments).
More sanding is needed for the bottom right corner of the white part as well.
Some paper glue in the middle solved the problem.
The final result. ^^
Done, for 3 parts among 368 in this posting. XD The 4 tiny stripes toddle off their intended positions when the rear portion of the clear part is cut away, which is quite unfortunate, but I'm too lazy to fix them anyway. ^^; A lot of time was spent on this delicate work, which is almost as crazy as painting the many helmets of my Gundam Exia kits, detailing the cockpit in MG Destiny Gundam, modifying Iron Mask in MG F91 and fixing the hip joint of MG Zaku II. There's always that huge sense of adventure, and then uncertainty of whether it will work or not, but finally the great satisfaction when all is done, be it just one or two parts from the entire kit. ^^
I remembered one or two kits I have with parts bloodied when I cut my fingers during the assembly, I will always remember those "special" parts. The head sensor of MG Infinite Justice will be the special part in that sense for me. ^^
On the other hand, after such a delicate work, I don't feel like picking up the rest of the parts of this MG so soon. ^^;

Image is from Good Smile Company.
Content and lazy. That's exactly how I'm feeling right now. XD
Will have something else in the next posting. ^^