Prelude to its bigger equivalence ;)

Bought this some time around the beginning of last year, and it was stuck in my closet awaiting its unforeseeable date of assembly.
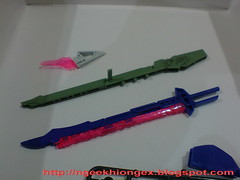
One night I got so bored I built its head, and the weapons, and left everything else hanging, till now. ^^;
Luckily I never had any bad dream of being haunted by a bodiless Destiny XD
As with the other BB Senshi SEED Destiny models, the articulation of this Destiny is superb. It can move as much as the HG version, and with all the weapons included, all the action poses the Gundam performed in the anime are possible.
However, the biggest attraction of the kit for me is this:
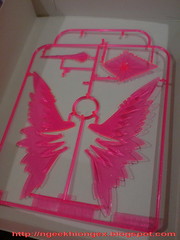
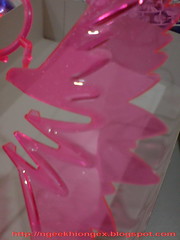
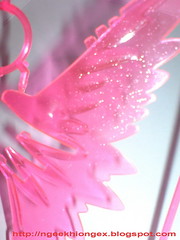
Not enough with the articulation of the wings, a pair of beam wings, the Wing of Light are included, with glittering effect on them some more. ^^
Just can't wait to try them on the completed model ^^
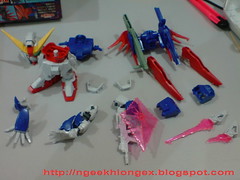
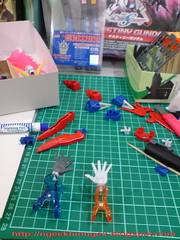
A few parts completed before this review:
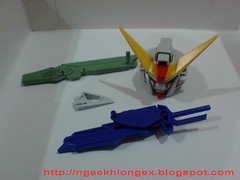
I found it to be too irresistible to wait for the right time to build everything together so I started on the head and the weapons first.
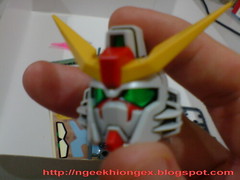
Done for the head: painted gray for the Vulcan, panel-lining and even applied the foil stickers to the eyes and main camera.


Super-straight assembly, without even the remains of the Gates cleared off.
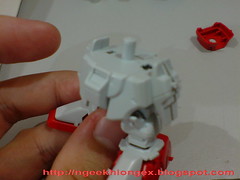
* Notice the huge size differences between the spread palm and the hand. XD
At first glance, it certainly has more parts and better color allocation for the various parts as compared to BB Senshi Sangokuden, but quite a lot of painting is required nonetheless.
Several major parts for painting:
- hands & spread palm (4 parts): white => gray
- beam shield generator (4 parts): blue => yellow
- beam shield (1 part): clear pink => blue(?) & yellow (generator)
- top cover of the wing (2 parts): red => black
- beam rifle (1 part): white => gray
- neck area & collar (2 parts): blue => gray
- anti ship sword (2 part): blue => light blue & white
- mount racks for anti ship sword & beam launcher (2 parts): blue => black
- skirt armor (2 parts): white => blue, red, & black
The biggest challenge is the beam shield I think. Molded on the same runner as the beam wings, the shield is in clear pink instead of clear blue.

How to retain the transparency of the shield while changing the color is on my head right now ^^;
Also, since it has much more gimmicks and articulation, I'm quite concerned about how the painted parts may be affected in certain action, and how I can minimize on that.
Started painting the spread palm:

Use a toothpick to get the paint into the tiny spaces between each finger.
Painting of the other parts will be in the next review.


9 comments:
To keep the transparency, use a clear blue spray paint. I've used it before for beam sabers and it keeps the transparency. I think it's called Tamiya Clear Blue.
>>Andres
Thanks for your idea. I don't have that paint, and I actually did the beam shield already XD
Part 2
Clear Blue for transparent part? isn't it change the part color become (more like) purple?
have you been a situation that you need orange color? i'm surprised that gundam markers don't come with orange color...just take for example HG Duel and Blu Duel. how do you deal with orange if you don't mind me asking.
>>Peter
I would go for the normal permanent marker for the Gate marks and foil stickers if given. As long as it's not that visible, I'm OK with it.
I actually have a whole set of permanent marker in various colors not available in the Gundam Marker series, color like brown, purple, orange, and so on. Can be quite handy some times.
Tamiya has paint marker in Orange actually. Maybe you're interested? ^^
http://www.hlj.com/product/TAMPM-X6
I'm looking for their Flesh color for painting the little figures included in MGs.
http://www.hlj.com/hljlist2/?MacroType=PntMrk&Maker1=TAM&searchpage=Suptop&Dis=-2&GenreCode=Sup
You should watch out for the shoulder joints, I had the same exact model and that is the first part to snap.
permanent markers? what brand? are they like the one sold in bookshops? don't tell me u use some sorta 'magic pen' i used to use in primary school haha.
i used to use black permanent marker on my HG1/144 Freedom wing. (the wing comes molded in only blue color). but permanent markers give off that weird 'gloss' look haha (esp with the black color..sorta purplish gloss). if u know what i mean.
guess i'll start hunting for orange permanent marker. my HG blu duel has been on hold for half a year already.
talking about painting figures...that reminded me of my gai and lowe unpainted figures from NG1/100 Astrays haha. and recently i got Lockon stratos 1/144 figure from GN Arms type D
-.- now painting that is gonna be a pain ><
>>Peter
The marker set I mentioned is from Yosogo, but I have Faber-Castell, Zebra, Stabillo and others as well. You can say that every time I go to the stationery store I would look at the markers sold there, and try out new ones if I like them.
You're right about the color being glossy for permanent marker. I painted blue for my BB Senshi Freedom - all blue for the wing, and the color (black) is glossy. ^^; That's why I avoid using them for large parts now.
Purplish black paint? Then I'm guessing you're using the one from Yosogo? Try Stabilo Mark-4-all Permanent. Very black. ^^ Or for small surface, Simbalion Marking Pen No. 600.
Or Gundam Marker Black to save all your trouble XD
haha gunpla has made me into a weirdo. everytime i go to like hardware store or even just normal shop i'll always be looking around for alternatives for my gunpla.
eg. modding Nadleeh's hair. i HATE the red rubber included.
i remember looking through dusters, brooms, wires etc. now i'm trying with red fishing line.
now i'll add stationery shop into my strolling list haha
Post a Comment