Tuesday, March 31, 2009

1/100 Astray Red Frame Part 7

Gerbera Straight, sanjo!

Quite a long halt between this review and the last one. ^^; Actually I've got all the images ready yet no time to write up anything about them, and the problematic connection at home for the last few days wasn't helpful at all.

Anyway, finishing up on the katana ^^


Painted the other side of the tsuba (hand guard) in gold when the first part has dried and I could use a paper clip to hold it for the painting.


Painted gray for the handle using Gundam Marker Gray from SEED Basic Set.
I only gave it two panel lines - where the handle meets the gold parts on both ends.


Assembling the blade, handle and hand guard. No glue is used, so that the blade can be detached in the future.
I just relied on the two pegs on the handle plus the hand guard to lock the two pieces together.


No panel-line for the diamonds on the handle - while those diamonds are alright, the red line that connects all of them is too small for any panel-liner I have not to cover it up after the task. In the end, the red line would become a black line instead ^^;

Learned from experience with my HG 1/144 Astray Red Frame.


Gerbera Straight, sanjo! ^^


17.5cm in length ^^


Comparison with the katana from my HG version. Major improvement in terms of color accuracy.


Closeup on the hand guard, a part which I did poorly for the previous HG version.


Comes with a option palm large enough to fit the scabbard near the koiguchi area, but it's too big to actually grasp it.


Comparison with MG Shin Musha's blade - shorter, with elevation on the body, but no hamon or tang either.
Overall, not as decorative as 1/100 Astray Red Frame's. ^^

Since I've not built the model yet, I'll ask another Gundam to demonstrate the katana for this review ^^

A practice for my MG Gundam Ver. OYW to allow me to see how fierce he can be as Shin Musha.


The katana is alright, but MG Gundam Ver. OYW's tab on his hand prevents him from using the katana right. The advantage though, is his MG-styled hand which allows him to grasp the scabbard while posing with the katana, an advantage 1/100 Astray Red Frame can never have.

With the katana done, I'm all done with the work on Astray Red Frame. I'll let all the parts dry a little longer before actually assembling them. Will move on to another Gunpla soon ^^

Saturday, March 28, 2009

1/100 Astray Red Frame Part 6

Scratch scratch scratch

Try saying that 10 times without pausing XD

After leaving the painted parts from Part 1 to dry off for about a day, now comes the time to fine-tune them, particularly those small red lines on the scabbard and diamonds on the handles.

But first of all...


I suddenly regretted painted the end-cap of the scabbard in red. In part 1, I was like, "Oh, a bit of PG element for this 1/100 scale version would be cool." But last night I was like, "Oh, why should I follow the PG design when the two are totally different anyway?" ^^;

In the end, I decided that red for the end-cap isn't exactly the color that would make me feel comfortable and it should be orange on gold instead, just like what is shown in the manual.

I guess my friends were right about me sometimes, ^^; for someone being too "死心眼" (stubborn) XD

Anyway,


Just used my knife to scratch off the red paint and then paint the kojiri in gold again.


Scratched off the red paint spilled over the wall of those thin red line on the scabbard using the same method as well.
[the one on the top is a completed one]

For scratching excessive paint off a part, a sharp knife is important, but a piece of cloth soaked with water is equally important as well, else where do you think you should dispose those particles that came off from the work? ^^ It's a bad idea leaving them around on the table, which might resulting in you inhaling some of them during the whole process.


Both pieces of the scabbard done ^^


Same thing for the diamonds on the handle as well.
[the one on the top is a completed one]


Painted the Vs on one of the two pieces in red, not just the top surface but around them as well so that no white space can be seen when the handle is assembled.

The Vs are pegs that would bind the two pieces of the handle.

Painting the kojiri:


Orange on gold as shown in the manual


Marker used is Yosogo Permanent Marker Orange


The scabbard is assembled first before the painting, and cement/glue is used because there are too few snap-together points to bind the two pieces. I used paper clips to hold them while waiting for the cement to dry completely. Unlike the wait for Gundam marker paint to dry off, which can take up to a day (my preference), I think I just waited half an hour for the cement.

The reason for assembling the scabbard before painting the kojiri is to deal with its edge. Much like the kissaki (point) of the blade, the kojiri is supposedly sharp and has fine yokote (point-line) for this model,and of course it's not, for protection purpose for younger modelers. But still, the yokote should be painted as a single line using the marker, and you can't do that if it's on two pieces.


Painted kojiri - much darker orange than I expected because I painted more layers using the marker mentioned above. I was too careful to avoid touching the border, so my painting was too sissy. ^^;

But I'm pleased with the result actually. Darker orange is fine, because Gundam Marker Gold produced darker tone of gold than what is shown in the manual. So the two colors still match I guess (for being darker toned). And you can still see the difference when you compare the kojiri to the other red parts. ^^

With the body of the scabbard completed, there's no point leaving the Koiguchi (mouth) unassembled.


But there's a little consideration here:

The Koiguchi has a layer a red paint inside, and the Habaki (ferrule) has a layer of gold paint. When the sword is sheathed, you will get the two layers of paint rubbing each other off.

So to deal with that, I scratched off a bit of part from both ends inside the Koiguchi to accommodate the paint of the Habaki.


The blade fits in nicely now. ^^

Also, you could probably guessed from the painted Koiguchi that I didn't expect this issue to arise at the beginning. ^^; I found out when the blade stop sliding into the scabbard right at the Habaki.

Panel-lined the hamon (temper line) and Mei (signature) on the Nakago (tang)


Very very beautiful indeed ^^

Part 7 is coming up, and that would be the last part for the katana, last for the pre-assembly work for this model too. ^^

Friday, March 27, 2009

1/100 Astray Red Frame Part 5

With patience and respect

This review should be up last night or this morning actually, but I was stuck half-way writing about it after all the work, so right now I have to recall my feeling while going through the tasks mentioned below. ^^

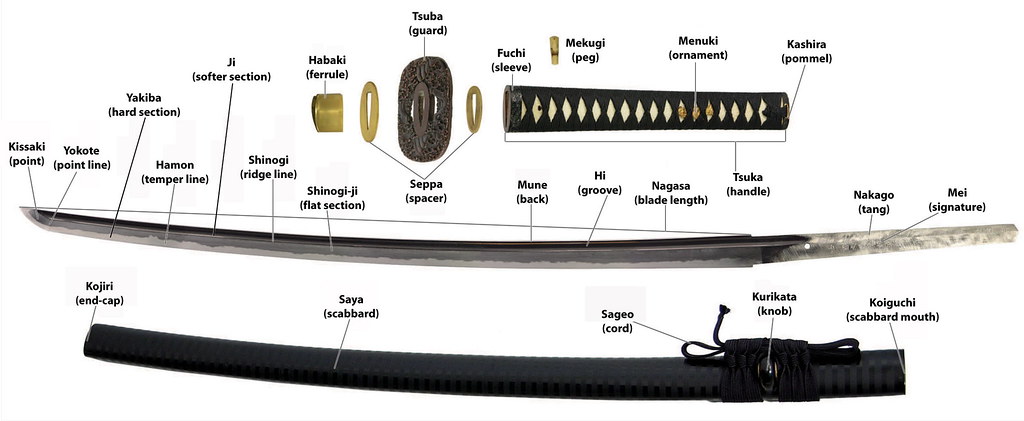
First of all, the names for all the components of a Samurai sword:


Image from Paul Chen Swords

As with many boys, the design of Medieval body armor, weapons and warfare strategies have been part of my interests since primary school. So, it's just natural that the history of the Samurai has been fascinating to me since the first day I learned abut it. Actually it started off with my deep interest in their heavy decorated body armors and beautiful helmets.

There's a saying that the Samurai's sword is his soul, and for that, I've mistaken that Bushido was about the art of the Samurai sword for quite a while. When I learned that it's the way of the Samurai's life rather than the sword itself, the weapon seemed even more intriguing to me, which lead me to do some readings on it when I could.

I watched on video some time ago the introduction of this Oriental weapon and how one is made. Not merely forging a blade, the whole sequence is more like a sacred art. Each component of the blade is made by master craftsman, and the completed work will be passed to another master craftsman for another component, until all parts are done and the katana is completed. Each of those craftsman has been specializing in that specific part of the sword for generations. A single sword can take up to half a year to complete, without the help of any modern technology, nor any exact documentation on how each part is to be made is available.

I've never seen a real Samurai sword, so I can't say I would know how one should feel when he has the sword. And for the record, I must say that I'm not respecting the sword for what it's primary meant for, but for the beauty and the craftsmanship of the sword, as well as the principles of Bushido.
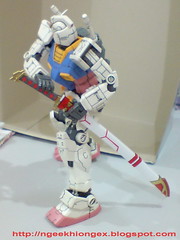
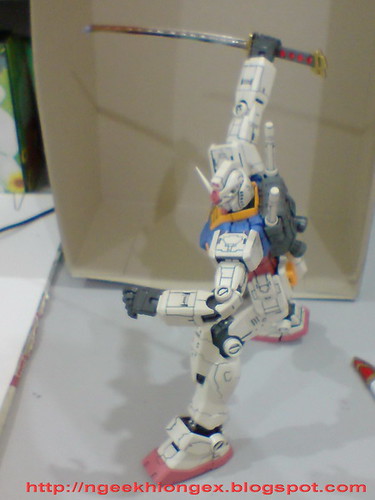
I've built the 
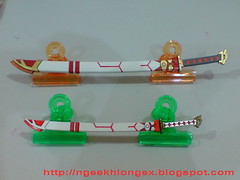
1/144 scale version of Astray Red Frame many years ago, when I have no Gundam Marker at all. Still, the sword was handled with great care and patience so that it could be as color accurate as the official design. I only relied on red normal marker for the red parts, silver oil-based marker with very thick tip for the blade and gold one for the golden parts. The gold marker produced unsatisfying result for the hand guard and pommel. After that, for not spoiling the scabbard, I didn't paint the gold parts on it with that marker.

Will show you the comparison when the sword is completed.

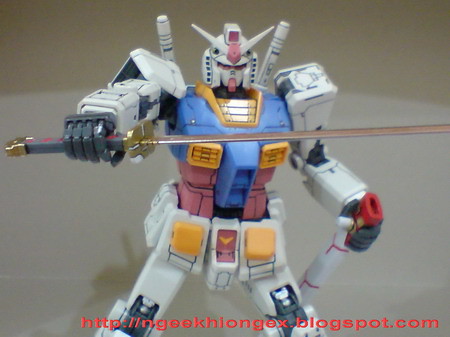
And now, it's time to redeem that regret I have for my 1/144 Astray Red Frame. The 1/100 scale version is much bigger, so it should be easier to paint, the blade is in metallic coating, so I don't have to worry about painting silver on it anymore. All the other components are in white, so I don't have to worry about covering base color of any sort.


Plus, I have Gundam Markers now, designed for Gunplas. So, there's no reason for me to fail this time. ^^


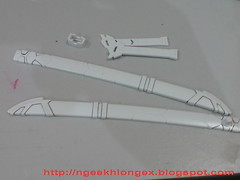
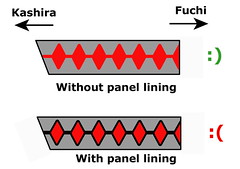
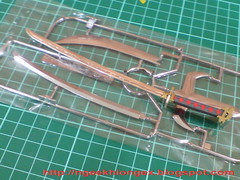
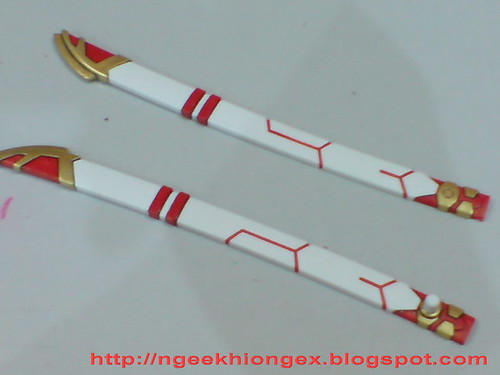
The first step I took was to panel line the different parts on the scabbard. None for the handle though, because I don't intend to have as little panel line on that component as possible. Will show you why when I paint it.

Also, the panel lines drawn are meant more for our eyes instead of actual panel lines for the parts. Entirely in white, it may be hard to distinguish the border between parts that should be in different colors, and that often results in painting overshoot. Panel line first can save you from a lot of troubles.

Those lines won't guarantee that you won't overshoot, but at least not too much, and you could detect places you overshot easier later on.

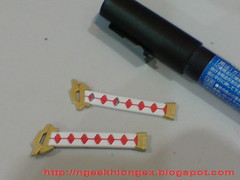
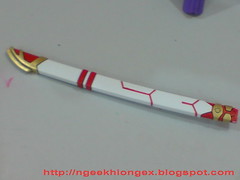
Started with Gundam Marker Red first:
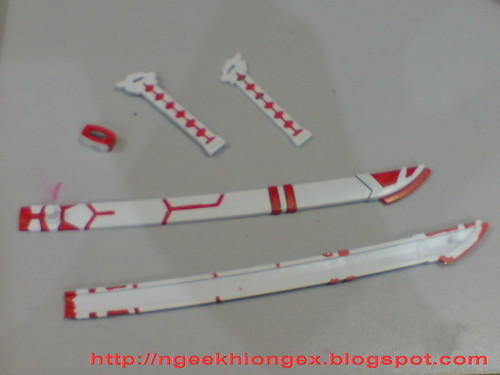
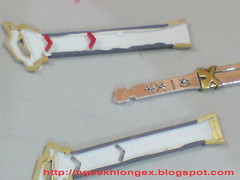
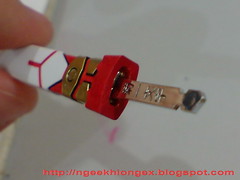
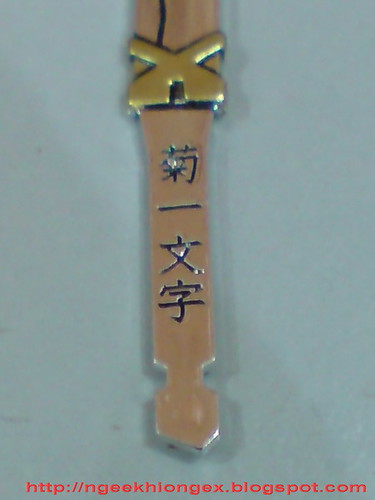

The kojiri (end point of the scabbard), Koiguchi (mouth of the scabbard, including the small separate part) and the two red bars on the body of the scabbard are easy because they have large area to paint on. The red diamonds on the handle and the thin line that connects them, plus the lines on the body of the scabbard are much harder - not about painting, but to avoid spilling the red paint over the wall (drain if you like XD) of the lines. I'll have to scratch away the excessive paint when it dried.

Also, I painted a little bit further into the interior of the Koiguchi as well. This is so that when the sword is unsheathed, folks won't be seeing white interior of the scabbard, but red instead.


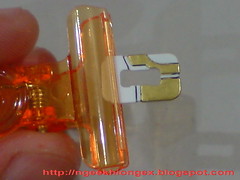
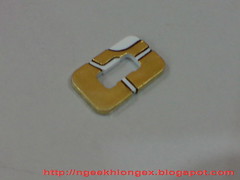
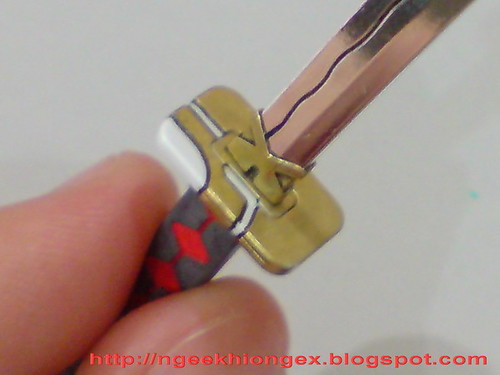
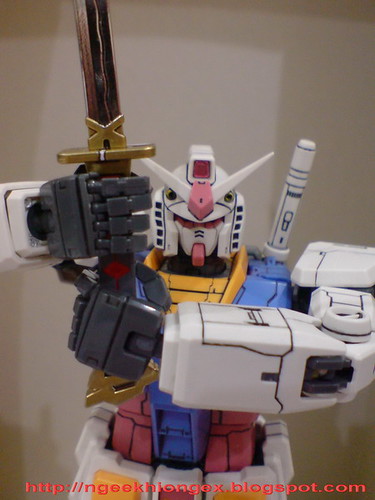
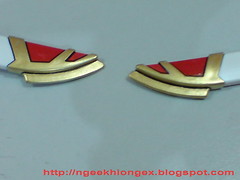
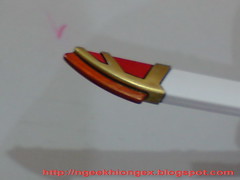
Gundam Marker Gold from BB Senshi Sangokuden set saw action for painting the hand guard, Habaki (ferrule - on the blade), Fuchi (sleeve) and Kashira (pommel - both on the handle). Only one side of the hand guard is painted, because the other side is needed to hold the whole piece to dry.


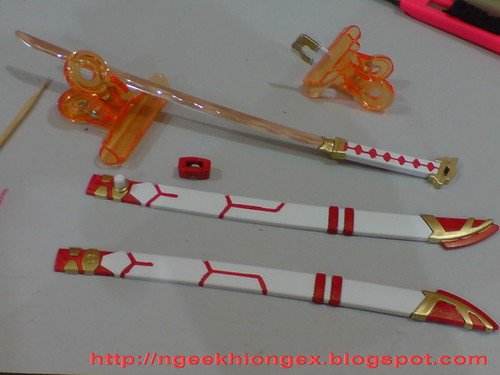
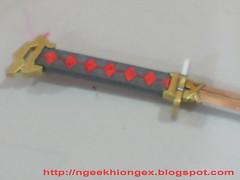
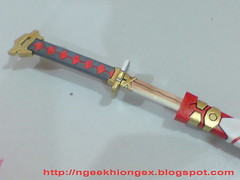
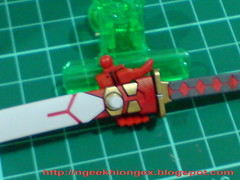
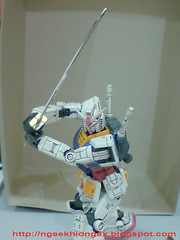
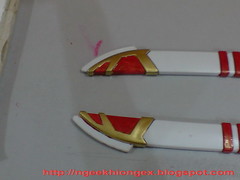
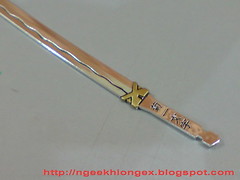
Part 1 for the katana is completed. ^^

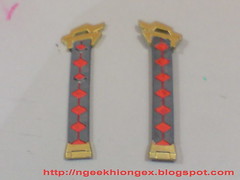
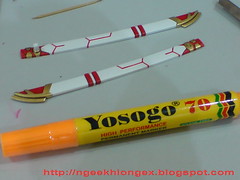
Two things you would probably notice in the last image above:
- The peg (not the mekugi) that stands out near the koiguchi is not painted. This is the part used to mount the scabbard to the side skirt armor, so on and off for a while, the color would be scratched off and that particular part would become ugly. I'll just leave it unpainted.
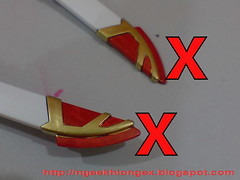
- the kojiri is painted red rather than clear orange on gold as shown in the manual. I was hoping to have a bit of linkage between this kit with just recently released Perfect Grade version, but in a manner not so obvious as well since it's clear that the PG release has redefined the designs for every part for the katana. It has red kojiri, really big one too. Not exactly a very significant part, it seems like a good spot for a bit of color variation to me. ^^

Still pondering on this at the moment though, even though it's painted already ^^;

Please look forward to the next review on the katana. ^^