Wednesday, September 29, 2010

Always Beginning, Beginning Gundam

I am I, you are you, he is he, and we ...

The release of HG 1/144 Beginning Gundam on Monday really got me thinking about a lot of stuff. ^^;

The trailer of "Gunpla Senshi Gunpla Builders Beginning G" released back in early August showed Haru Irei, the protagonist purchased a HG kit of Beginning Gundam.


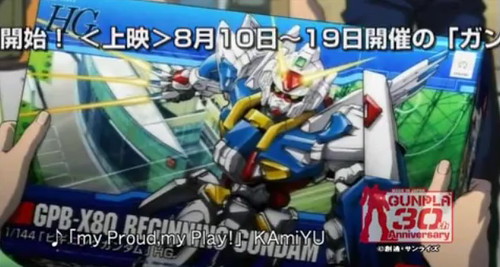
With the box art totally the same as the actual kit, it's interesting to assume that both kits - the one shown in the trailer, and the one released last Monday are indeed the same thing, because then my imagination would just run wild with a lot of funny questions, when the side of the box also shows Haru Irei and the anime.


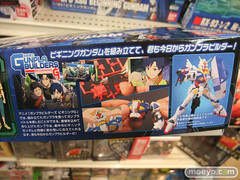
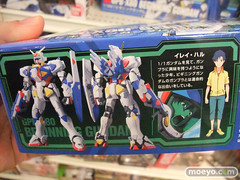
So when the boy is looking at the introduction of the Gundam on the box, he will be looking at the anime he is playing in. XD On top of that, he get to see the picture of himself at the event purchasing that kit too. ^^ In the introduction of the kit, Beginning Gundam and Haru Irei are shown as characters of the anime, so in the actual anime, the boy is looking at the introduction of an anime about himself. That's like the the anime inside an anime...

This is the perhaps the moment when even a psychiatrist would go, "Where are we?" XD

Don't think too much! That's the right way to go XD

Images are from this and this previous posting.

* The title "Always Beginning" is the theme of Gundam 30th Anniversary last year.

Tuesday, September 28, 2010

MG Crossbone Full Cloth Part 19

Bloody cut & paste I

Back to the review on MG Crossbone Gundam Full Cloth after a few depressing days of delay. No no, I'm no referring to the Chatbox incident on my main blog, that was the easy part. I was desperately trying to meet a few deadlines on and off my work - one just completed moments ago, and that was still part of the 'easier' bits. I mean, evryone's being chased after for some sort of deadlines now and then, a few bottle of midnight oil to burn should get you through. The worst part of my story is having all the photos on assembling the rest of this model gone because of a bad IO when transferring the images from my phone to the PC. Major bummer for me. I enjoy the process of building my models very much, so losing those photos would seem like having a huge part of the model missing altogether.

Luckily there was the interview with Elmo to provide some good moments through that ordeal.

Speaking of which, I have no intention of breaking my model apart for the review, so I'll just dissemble the major components and talk a bit about each of them. Come to think of it, the time required to redo all this seems like a really depressing thing as well. ^^;


One set of the armor - front and back.


Fangs are movable.
The lack of details on these part is pretty astounding for a MG model too. XD


All four pieces of the armors


Combine with the the shoulder armors.


Thanks to the joints on the shoulder armors, each piece can move sideways and be 'expanded'.


Very nice details of the individually molded thrusters on the edge of the armor.


The chest armor and the 'collar'.


The complete Cloth armor set.

And moving on to the individual components of the Gundam itself:

[Arm]


Articulation is pretty much the same as MG Gundam F91.


The beam shield generator can be rotated to the front, covering the hand unit to be used as the brand marker. The beam shield can be mounted in this position as well.


Details of the forearm when the beam shield generator is deployed to the front.
Almost like there's some sort of linked mechanism between the arm and shield even though the mecha detail part is just a single part.


Mounted with the beam spike (brand marker) and beam shield.

[Waist]


Simple looking waist, but is full of hidden weapons and gimmicks. ^^


Not much mecha details designed for the waist.


Front skirt armor forms scissor anchor.


The edge of the rear skirt armor can be removed to be used as whip.


There are tabs designed on the hand to be fixed onto the palm firmly, just like all the hand held weapons.


Discarding the many heavyweight weapons introduced in previous postings, the whip is a very 'refreshingly' flexible one. ^^


2 spots on each side skirt armor and 1 on the rear armor allow almost all the weapons to be mounted onto the waist.


The Zanbuster can be mounted as a combined weapon, or as separated beam gun and beam Zanber.


Even the huge Murasame Blaster and Peacock Smasher can be mounted.
But troublesome moments is guaranteed when you try to do this when all the armors are on. ^^;

Next posting will be on the rest of the components to complete the model. ^^

Saturday, September 25, 2010

Interview with Elmo

"It's a monster thing"

This sure is nostalgic. ^^


Video clip is from Youtube. Follow this link to the website if you can't see anything.

Friday, September 24, 2010

MG Crossbone Full Cloth Part 18

Weight loss scheme

Continue from the previous posting, still working on the weapons of MG Crossbone Gundam Full Cloth.

Another special weapon of this Gundam included is the Murasame Blaster - a blaster it is called, but most of the time, I see it being wielded as a giant sword with 6 beam spikes on each side of the blade instead. It does come with a beam rifle type handle, and the sharp tip of the weapon is removable. In this form, it does resemble a blaster.

Like the Peacock Smasher assembled in the previous posting, this weapon is extremely heavy, even before the clear beam parts are mounted. While such weight issue is unavoidable for the Peacock Smasher, let's see if we can do anything about the parts of this sword to help it loss some weight. ^^


All parts for the Murasame Blaster.


The yellow beam emitter inside the sword comes as 2 solid parts.


Some weight can be taken off the sword if the middle portion of the yellow parts is cut off.
This is fine in my opinion since only the edge of the yellow parts will be exposed when the sword is done.


Clip off some of the yellow parts using plastic nipper first.


The metal file tool from Bandai's basic Gunpla tool set then comes in for some serious kill.


Sand off the even more of the middle portion using the metal file tool.
Wet toilet paper (cheaper than tissue) under the parts helps to prevent the dust from going all over the place.


Comparison with one yet to join the weight loss scheme.


Done for both yellow parts.


This is how they will look inside the sword, which will never be seen again when the other piece of the sword comes on.


The completed Murasame Blaster.


The work did on the yellow part is totally not visible from the outside. ^^


Details on the sword guard and handle.


Mounted with the beam parts.


It's still quite a heavy weapon for the model to actually hold it.

Done with the hand held weapons that require assembling, moving on to the cloth armor. The Gundam does feature quite a few more weapons, all on its waist armors. This will be shown when I move on to assembling the armors onto the Gundam.


Parts for the shoulder armors, which can be used as boxing gloves later. XD
There's one part I didn't put in here I think.


2 pins on the white part are painted gray so that they would look like they are part of the mecha interior in line with the gray part.


Done.


The teeth can be folded inwards for the armor to be used as the skull knuckle.


Front body armor (right) assembled.


Rear body armor (right) assembled.

The left hand side of the body armors are just parts mirroring the one shown above.