Skipping the review on my MG Zeta Gundam Ver. 2.0 for this one first.
Building Gunplas isn't about building new stuff all the time. I remember someone asked me in the past about how I keep my Gunplas from being damaged. My usual method is keeping them inside their boxes after completion to minimize the risk of them being damaged by external factors, like falling down from the shelves, knocked over by certain things and crashed etc. Nothing fancy at all.
It's also a cover-up for the fact that I don't have any more space in my room to display them ^^;
But anyway, while they are safe inside their boxes, "unfortunate" events do happen when I take them out from the boxes. ^^; Some of my Gunplas had faced such ill fate before as well. The worst case in my record must be this one - MG Zaku II Ver. 1.0.
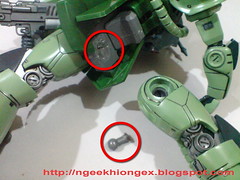
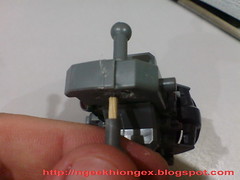
Can't remember how exactly did it happened, but quite sometime ago, I broke the hip joint of this MG. ^^; The skirt joint restricted the movement of the pelvis' ball type joint, so it doesn't move much. That is the weakness of the design. However, I must say that it was too long since I last took him out from the box that I forgot that he has that weakness. I must had been pretty rough when trying to move the leg and so, my carelessness was punished with its joint broken clean off.
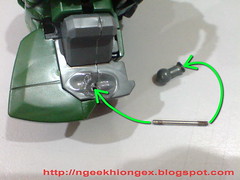
As you can probably guess from the image above, the first method I tried for savaging the problem is by heating both parts - the hip and the broken joint with a lighter and tried to "weld" them together. That didn't work because the hip part for this Zaku is actually hollow in the middle. I remember the heated joint almost rammed through the hip on the very first attempt. ^^;
A failure it was, and looking at the tools I had back then, I couldn't come up with something better to fix the problem, so I kept this broken Zaku in its box, but the determination to fix it never left my mind before.
For more than 2 years now I think, I read about other modelers' experience on various forums and magazines and consider using them. I would occasionally come up with some idea only to abandon them in the end because I wasn't very sure of them myself. After plenty of searching and asking, finally I decided to make my move.
Might sound too dramatic for professional modelers, but having no experience in this area and living in a place where various tools and resources are not easily available, I believe the time spent on researching the matter and gaining the confidence through that to actually do it isn't a waste at all.
The idea is somewhat simple - drill a hole through the joint and the hip, connect the two parts with a metal rod and close the opening between the two parts. Special tools will have to be acquired for drilling the hole and closing the "wound" between the two parts, which will be introduced in this set of review.
A metal rod was the original idea because metal is supposed to be strong, but after a while I realize it's not really viable when I compared the diameter of the joint and the metal rod I prepared for the work, so I opted for a different tool instead.
This metal rod isn't a special tool I bought for the restoration work, it's one of the many pieces from a capsule toy I collected many years ago, supposedly for assembling a miniature bicycle model. The bicycle was separated into different sets. I remember spending quite a lot of my RM1 coins (when it was still around years ago) on the capsule toy machine but never being able to get a complete set.
I suppose everyone who indulged in capsule toys through those machines will know of such frustration ^^;
Anyway, I ended up having plenty of such spare parts. Never imagine they could be helpful in this kind of situation though. ^^
But actually in the end I didn't use the metal rod. Maybe it will come up handy in other situations and other models, so I'll still keep it in my toolbox.
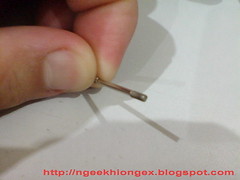
First thing to do is the polish the end of the joint, which was deformed by the first attempt of mine heating it up years ago.
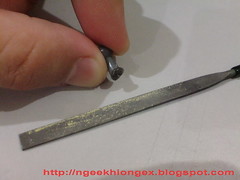
Rough sanding first using the metal file tool from Bandai's basic Gunpla tool set.
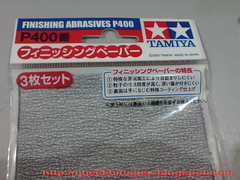

Finishing with Tamiya paper files 400, then 600 and finally 800.
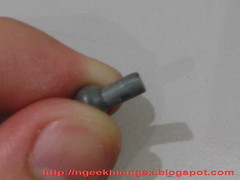
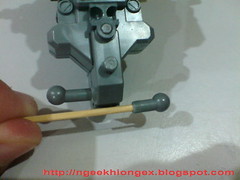
This is how the joint looks like the work is completed.
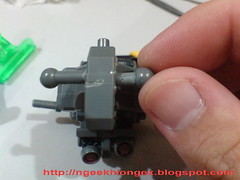
Compare it with the hip and it's very obvious that the joint is now too short as compared to the other one. Those deformed plastic sanded off just now must be from somewhere right? ^^; The next step is to install a metal rod into the joint which will connect through the hip, at least that the initial idea.
The problem as I realize it, is that the metal rod is too long. I'll have to drill the whole length of the broken joint in order to fit the entire rod, else there will not be enough room in the hip for it to fit. And obviously it has to be very straight as well. As such, a metal rod doesn't seem like something I can handle for this job anymore. ^^;
Cutting this rod is not possible, for those who are thinking about that, the quality is not that of a string (at all).
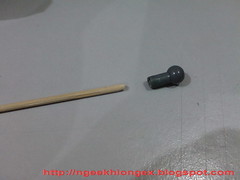
So, I have to come up with a replacement for the metal rod, which must be more versatile than the metal rod, but has enough strength to become the joint as well. For something with that kind of quality, I could only think of this looking into my toolbox. ^^;
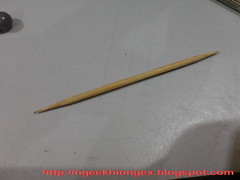
The very modest toothpick.
Sure enough, you can cut a toothpick very easily with a pliers, but you can't break it very easily. Sounds like a nice substitute for the metal rod. ^^
The next step on the task list is to drill the hole for the toothpick to fit through the joint. Another special tool kit is required: pin vise and drill bit set.
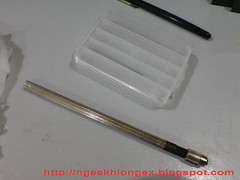
I used to call it hand drill, but from what I read, "hand drill" is not the synonym for pin vise, as you can also get electrical hand drill, which is meant to be used in a rather different way from a pin vise, or so I heard. The online store where I bought it from set the name to be pin vise as well, so it's best for me to just follow the name.
A pin vise is basically a small tool you use to hold the drill bit. Together they become a mini screwdriver-like tool that allows you to drill on plastic kits. I've seen modelers using this tool to create new details on their kits, like installing screw units, drilling through parts to install wiring for LED lighting system and so on. It's quite an essential tool for people going into modifying their kits.
The pin vise and drill bit set are sold separately. You can get the pin vise with a rather low price. As long as the connector can support the size of the drill bit, any brand would do. The drill bit set on the other hand, is quite expensive. The set I bought, Tamiya Fine Drill Set 0.3mm, 0.4mm, 0.5mm, 0.6mm and 0.8mm cost me RM50 I think. They are very, very delicate tool.


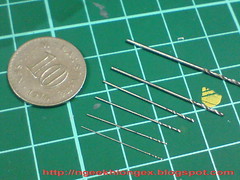
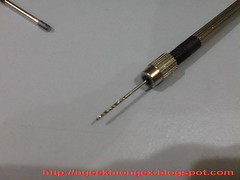
The largest drill bit shown in the image above isn't from the set though. I bought from a local hardware store. I was told that this drill bit with the diameter of 1.0mm is the tiniest one sold at the shop. So, for hobby purpose, I don't suppose one can get those tiny drill bits from other than hobby stores since hardware shop normally don't have such delicate sizes for them.
The 1.0mm drill bit doesn't really fit into the pin vise I bought - it was never meant for that diameter. It's actually not advisable to forcefully insert the drill bit of an incompatible size into the pin vise as it may ruin the latter. I kept that risk in mind while working with it.
Anyway, even with the largest size drill bit, it's still too small to drill a hole in the joint that can fit the toothpick directly. I had to improvised by drilling multiple times and around the center of the hole to widen it. Can't remember how many times that was, I only stopped when the hole is large enough to fit the toothpick firmly.
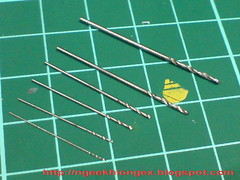
After that, measuring the suitable length for the "new" joint before making the cut
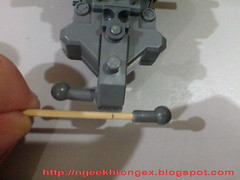
First phase of the work on the joint is done, but some work must be done on the hip for it to accept the joint (toothpick). That will be covered in the next review. ^^


5 comments:
the EXACT same thing happened to my zakuIIs 1.0 MG i just threw it in the trash i hated that thing anyway, cheap mg and had horrid articulation
Very creative solution. Same thing happened to my MG Re-GZ, but I never attempted such a complicated workaround. I tried super glue but it eventually broke. It just stands kind of awkwardly because the leg isn't actually connected, but it still balances well enough.
wat u could have done, yrs back, use tamiya cement, thick one, apply and let it set. if worry not strong enuf, superglue back. i'm sure there's mark for aligning it back. den deal with the white marks left by the superglue with paint or markers to cover. excess can be sand off
I used a toothpicks instead of metal rods also. ^ ^;
To be Honest, id stick with the metal rod, just layer some pla cars on the hip joint stack it up until you got the right lenth.
The words of a Hippie" Toothpicks are evil, floss instead" ^^;;;;
Post a Comment