Take note: window without 's' at the back since he has but one eye. XD
But truly, for all mono-eye mecha, I think the eye is the only tool to express their emotion. If you look at the box art for many Zeon MGs, you will find that they has their mono-eye camera rotated to a certain angle, looking at you, while the head is still facing the front. Somehow those MSs would look as if they are saying, "My only eye is stalking you wherever you move." To me, that gives a sense of power and fearsomeness to these MSs.
That's what fascinate me so much about mono-eye MSs actually.
Image from Dalong Dotnet.
Tieren gives me the same sense as well. For the model, unlike previous mono-eye HGs from SEED Destiny (Zaku Warrior, Gouf Ignited, and all their variations), Tieren is designed with a movable mono-eye camera. Not for extra credit, but because it's necessary - the head is non-movable. ^^;
And it's so small too! ^^;
I still have the feeling of it being fierce and all that, but how should I help him to show it?
The foil sticker is definitely out.

Image from Dalong Dotnet.
Applying foil sticker over round part leaves ugly fold wrinkle at the edge of the sticker. ^^; That's the same weakness on Zeon MGs as well. When I started painting the mono-eye camera for my Zeon MGs instead of using the sticker several years ago, I actually went back and teared off the sticker for the older ones and paint the eye.
The mono-eye camera of MGs are easy to paint, and manipulate as well, because it always come in clear part. Different ways of painting it gives it different feels.
It's a little difficult for Tieren though, as the mono-eye camera is in dark gray, molded on the same part as its base.
Time to have fun with the many 'wicked' painting tools I have.
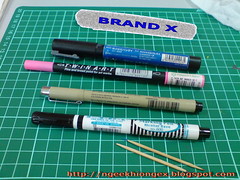
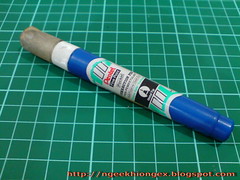
(Bottom up) toothpicks, black fine tip permanent marker, panel-liner (Sakura Micron super-duper fine tip 0.05), pink art marker, Gundam Marker Gray from SEED Basic Set, and a secret tool ;D
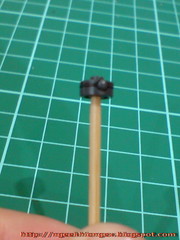
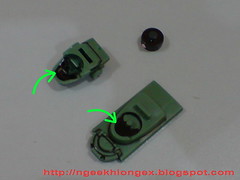
(1) Pin the part onto a toothpick for steadier painting.

(2) Panel-line the part

(3) Gray for the arc which the mono-eye camera of Tieren rotates upon and its base.
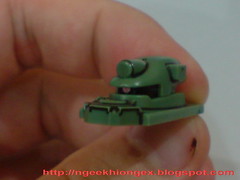
(4) Black (normal marker) for the body of the camera.
(5) Squeeze a bit of paint from the mysterious tool onto the eye. It's white.

(6) When the paint of the eye dries, paint it pink using the art marker.
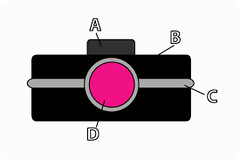
Color distribution of the whole part: (A) dark gray (no painting - this is the original color of the part), (B) black (normal permanent marker), (C) gray (Gundam Marker), and (D) pink (art marker).
Darker color around the eye also helps the mono-eye camera to be more outstanding, so I painted black for the interior of the helmet (on top of the eye), as well as the interior of the neck area.
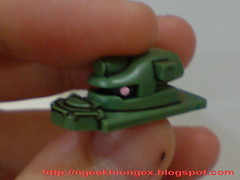
Success! Wuhhuh~ ^^
"How did you know it's going to work?"
Base on experience of course. I painted the targeting sensors of Zaku Machinegun and Zaku Bazooka on my HGUC Char's Zaku II in similar way.

The common feature between the two targeting sensors and Tieren's mono-eye camera is they have dark base color, which made painting all that troublesome.
However, two differences between them:
(1) the targeting sensors are much bigger
(2) they are on flat base; Tieren's mono-eye camera is a round part.
For Zaku II's targeting sensors, since it's on flat part, the color can be shown completely and evenly, since there's no curvy edge to offset the color.
However, you'll need to use a much lighter color for Tieren's eye so that it will stand out more as compared to its darker surrounding color, not to mentioned it's shaded by the helmet too. The most contrasting colors are black versus white no doubt, that why the part is painted black, and then white base for the mono-eye camera. A much lighter pink art marker is used so that the color would not overrule the color of the white base completely.
"What's that secret tool used?"
Hehe XD
Click to reveal.
"Why not Gundam Marker White?"
Against dark color base, you'll need a few layers of Gundam Marker to be enough to cover the base color. Applying so many layers of paint on such a small paint is not exactly advisable, because it's going to make the eye become bigger than how it's supposed to be.
With the secret tool, one layer (one push of the tip) is enough.


8 comments:
I started painting all my mono-eyes as well, but I use the fluorescent Pink Gundam Marker. Although it's a little bit darker than the pink you used, but with help of my black light, it glows, although more orange than pink.
I recently painted my 1/100 00 Gundam with fluorescent green (eyes) and pink (this ruby/diamond thingy on the forehead (from the inside of course)) and my HG Dom Tropen (Eye green and chest stored beam cannon with pink)
I posted one picture each at my blog, if interested.
tip-ex?! How can you do it? It dry so quickly so quite impossible to make smooth surface like marker do.
liquid paper?! wahlao...only you can think of using that lol.
good idea there.
I don't get the mono-eye mania (0_~)\ , but liquid paper instead of white paint is cool (0_^)-b.
lol I used that technique too!! I don't have enough money to buy gundam markers so I figured if I try using liquid paper it will work and it works!!^^
>>Ghosty-chan
I was thinking of painting the mono-eye camera of Tieren using Fluorescent Pink Gundam Marker as well, but I wanted the effect to more whitish for the eye to be noticeable for such a part - although it's supposed to be pink. ^^ That's why I didn't want to use a single color for the eye.
>>Anon
It's no problem for such a small part ^^
anyone here ever built an extra finish/metallic coating gundam?
Eg. Nu metallic coating, blue frame 2nd limited coating edition etc, freedom extra finish.
what did you do for nib mark removal?
Hahaha tip-ex. Such common stationary can do the work; you're truly a veteran on gunpla-ing~
Post a Comment