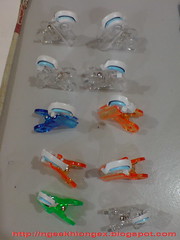
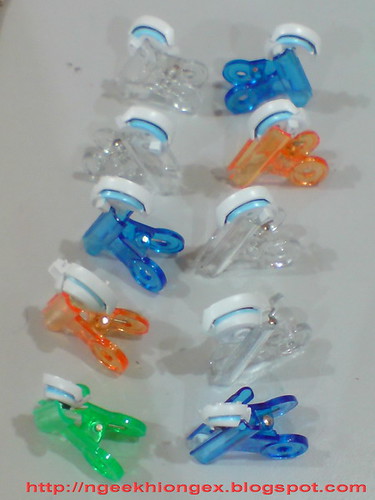
The helmets of Exia and Astraea are no doubt the hardest parts to paint in this entire project. You will need to use yellow, a bit of black, gray and light blue in various hard to reach places for the head, which are considerably small enough.
The 1/100 scale Exia's helmet has better design for painting in my opinion, as the helmet is molded in four separate parts, which makes painting a little easier. However, You don't even get to enjoy that bit of convenience for 1/100 Astraea and 1/144 Exia though. You have to squeeze the color through to those parts intended for those two models. ^^;
With that said, I'm painting all five helmets in one go, so that when I get to assemble each one of them in the future, I won't go screaming, "You again?" with plenty of sweat drops XD
Parts to be painted:
* 6 x 1/100 Exia type helmet - gray and light blue
* 2 x 1/100 Astraea type helmet - gray and light blue
* 6 x 1/100 Exia's sideburns - yellow and gray
* 2 x 1/144 Exia's helmet - gray, light blue, and yellow
Gundam Markers used:
- Gray from SEED Basic Set
- Light Blue from SEED Destiny Vol. 1 Set
- Yellow from SEED Basic Set

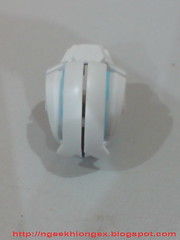
Started by panel-lining the slits on top of the head to help separating the border between areas to be painted in gray and light blue.
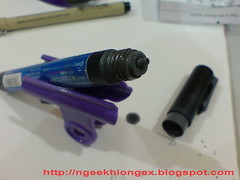
It's a long way to go for 10 parts to be painted delicately in gray, so squeezing the paint into a small pool like how I used to do in the past would be really wasteful.
Instead of that, I detached the head of my Gundam Marker Gray to get the paint from the marker itself. ^^
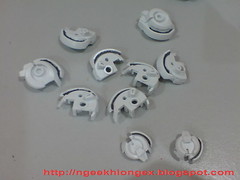
Raw finishing.

Second color going in was yellow for the sideburn.
As you can see, the parts for the sideburns and GN Condenser are separated from the helmet for 1/100 Exia, while there's no separation for the 1/144 scale version.
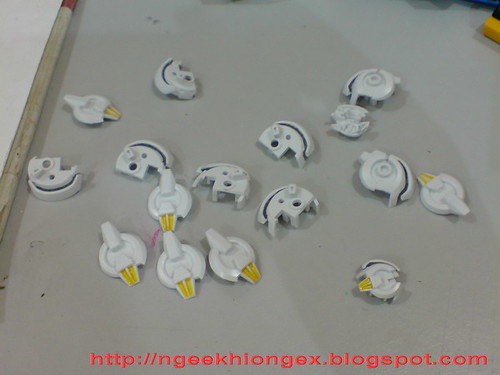
Parts painted in gray trimmed properly (by scratching off spilled over painting), but with the yellow sideburns pending for the same treatment.

Yellow sideburns trimmed, and the GN Condenser panel-lined before the next color.

Gray for the protruding part behind the sideburns. This part is flat and large enough for the Gundam Marker to be used directly onto it.
Moving on to the last part: light blue GN Stripes on top of the head.
Part separation for 1/100 Exia is very helpful for the painting of this part as there are more rooms for the Gundam Marker to maneuver, and less worries about spilled over painting. No part separation for 1/100 Astraea and 1/144 Exia means there's plenty of trimming work to be done after this. ^^;
The GN Stripe of 1/100 Astraea.
Like a hair cut, one has to make sure that the width of the stripes are well balanced on the left and right side of the head. ^^

A little bit of black right beneath the forehead to emphasis more on the eyes of the complete model.
Seems pretty fast for all the painting this time? ^^; Not exactly, the main reason is because I talk a lot less this time (Ha! XD) and show more photos instead. There were actually long pauses in between the different layers of painting, to allow the parts to dry off properly before moving on. It's not just about avoiding the colors from mixing with each others when the painting is still fresh, it's also about avoiding the painting to be rubbed off by your hand as well.


11 comments:
I thought the GN stripe/cable parts are supposed to be light purple? Or am I mistaken?
I like how the lay out looks as if you're mass producing Exia =D
i painted it black where u painted it blue...i followed the manual if i'm not mistaken...
Hmm, how exactly bro remove the marker's head ? Twist it counter clock ?
How do you scratch off the paint?
>>CD
Suppose to be in light blue, but I don't have that color, so I use light blue instead. the difference is not obvious at all.
>>Mikee
Haha. Thanks. ^^
>>AstrayP03
The manual has inconsistent guide for all the different versions. Exia has the GN Stripe painted, while Avalanche Exia and Astraea doesn't. I kind of standardize all of them to be consistent.
>>Evaritus
Tried again just now. Twist clockwise to open.
>>Allan
Just by art knife. ^^
How on earth do you tell the 1/100 heads apart? It looks the same to me...
lol i knew there was something i liked about this WIP. it IS mass production!
I just built a 1/60 exia under http://www.openhappy.com/hobby/exia_1_60_ng_ps.php (tutorial at the bottom). It is nice to see someone who also love the exia.
Hi Ngee,
Seeing this is good but a few questions and ideas (if I may!)
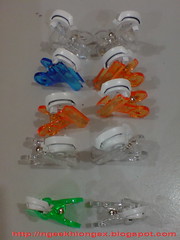
Firstly, the Green Highlighter, is that just a standard green?
Secondly, are you going to show off the Avalanche when finished (this is one of my first builds I did, I may buy another to do and I really,really like this - wish there was a Trans-Am version or a way I could paint one in Trans-Am mode!)
And here's a thought regarding the clear green parts. I tend to use a Stabilo Permanent Fine Green pen on the inside of the part to prevent smudging. Takes a while to dry but it leaves a pretty good clear green finish, but perhaps a little dark. I really want to see how this highlighter version works out because all the clear (GN parts?) are a key factor to the finihing of the Gunpla...
Good to see you on the building trail though!
>>Anon
It's actually quite easy to differentiate between the helmet of Exia and Astraea - one smaller and one bigger for the "ear" ^^
>>Martin
I think it's standard green. ^^; I mean, I don't know any other green for highlighter.
Yes about Avalanche Exia. ^^ But I haven't started on it specifically yet. All the parts I'm doing right now are identical for all the Exias I have.
Post a Comment