My review on this kit has finally move into its final stage - the Destroy Mode, and this posting is merely to show the transformation process.
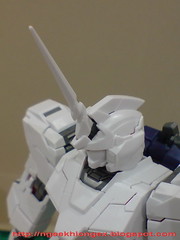
Before the actual transformation, you need to swap the V-Fin first, from the horn-type of Unicorn Mode to the transformable version of Destroy Mode. Next, separate the model into a few components as seen in the manual: the head, backpack, body with arms, and the legs.

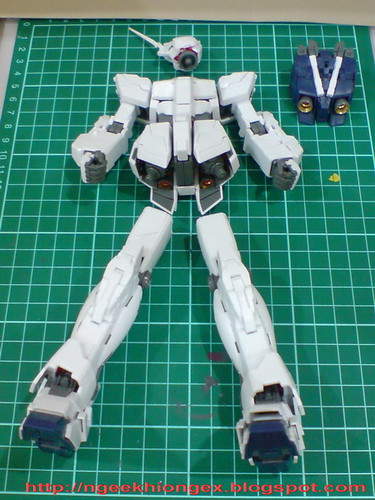
While not shown in the manual, I find it much easier if the arms are detached as well, mainly to ease the transformation of the most troublesome part for me - the shoulder armors. ^^;
Let's look at the transformation sequence of each component:
[Body]
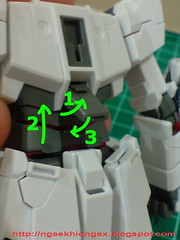
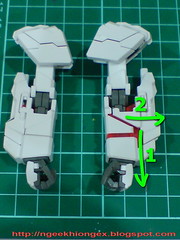
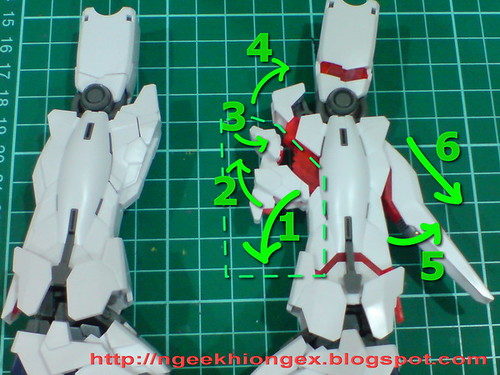
* (Back) lift up the tab on the spine, pull the body upwards to reveal the Psycho Frame beneath the waist area and then lock the tab onto the new position on the spine.
* (Front) Pull the shoulder joint horizontally to reveal the Psycho Frame on the chest area. Flip out the targeting sensor (?) on the shoulder area, as well as the armor covering the chest, to form a vernier-like design.
After a few times of transformation, the abdomen joint would become quite loose, and the entire upper body would be detached when you pull it upwards. ^^; Of course you can always press it back onto its abdomen joint when that happens, no problem.
The amount of Psycho Frame revealed at the waist area isn't much actually, you can actually see it when you flex the waist in Unicorn Mode. I suppose I was thinking, "Isn't it suppose to be taller/more to reveal for the waist?", which caused me to pull off the entire upper body the first time. ^^; Would still make that mistake now and then though ^^;
Pulling the shoulder joint horizontally was a problem for me at the beginning, as following the manual, the arms are not detached. So, instead of having the body pulled, the arms came off instead. That's why I find it much easier if the arms are detached first as well. You can pull the whole thing using the shoulder joint itself.
[Arm]
One of the easiest parts I believe. ^^ Just pull the arm downwards, and then the forearm beam saber part outwards.
The length of the arm is extended, a bit, definitely disproportional to the same feature for the legs ^^;
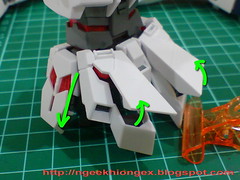
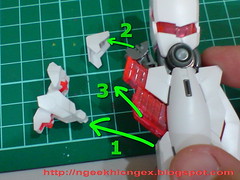
[Shoulder armors]
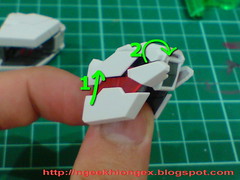

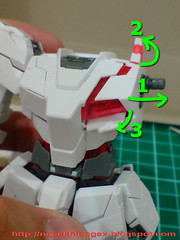
* Pull the upper part of the shoulder armor upwards, roll the extended armor and the vernier/thruster until the earlier looks as if it being pulled out directly from its original position, while the vernier/thruster is facing downwards.
The problem with the shoulder armor, apart from having the entire upper part coming off easily when you lift it, is the difficulty in understanding just how the mechanism between the extended armor and the vernier/thruster works for the transformation. The manual shows them moving together, but actually, they don't. You need to, and it's actually better off this way, adjust both of them at the same time.
It's not easy adjusting the extended part and the vernier/thruster with the upper part of the armor on actually. Plus, I always press the that part unintentionally during the process, which really annoys me. The easiest way to do it, is to detach the whole upper armor, fix everything, and reattach the armor again. That would definitely save plenty of troubles.
But that's not exactly transformation anymore I think XD
The completed arm units:

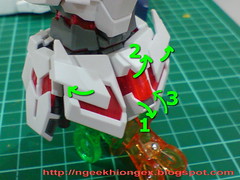
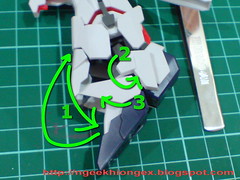
[Backpack]
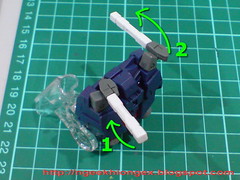
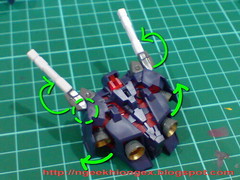
* Lift up the beam sabers from their compartments in the backpack (movement controlled by ball-type joints connecting the beam sabers and the mount racks)
* Turn the beam sabers around for 180 degrees, to the opposite side of the backpack (movement controlled by pin-type joints connecting the mount racks to the backpack)
* Rotate the beam sabers upwards (movement controlled by ball-type joints connecting the beam sabers and the mount racks).
* Open the side compartments, revealing the two extra rocket thrusters.
* Flip out the extra mount rack on top of the backpack.
The backpack is definitely mu favorite part for the Unicorn mode. As it turns into a very conventional twin beam saber type backpack with rocket thrusters, a lot of details are shown, not through lines but the overall structure and interaction between parts for the armors and the Psycho Frame. The details revealed through the transformation from a very ordinary-looking backpack into the Destroy Mode are very beautiful.
The edge of the mount racks would get in the way of the extra thrusters' compartment doors though (or the other way round if you like), as shown circled in the second picture.
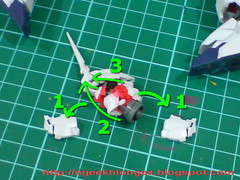
[Waist]


Rear view, shown with rear skirt armors removed.
* Detach the rear pelvis block from the original location, pull out the pelvis joints and then lock the pelvis block onto the new location.
* Then open hatches on all sides of the waist.
Pretty straight forward I believe. But as it turns out, the waist is the most annoying component of all for me, ^^; as all the panels would close at the slightest of touch, especially the ones on the rear skirt armors mounting another two thrusters. ^^;
Without any tab or lock to secure their locations, I had to check on them every time before taking a photo of the Destroy Mode in action, just to make sure everything s transformed properly. ^^;
[Head]

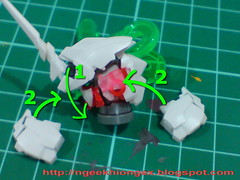
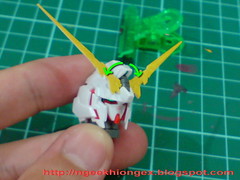
* Detach the armors on either side of the head
* Lift the entire forehead upwards until the Gundam-type face is free from the face guard.
* Pull the face to the front of the head.
* Flip the face guard backward, into the space of the Psycho Frame.
* Lower the forehead and reattach the side armors onto their original position, with the Unicorn mode design showing to the back of the head.
* Split the V-Fin
The most exciting part of the transformation no doubt. ^^ The transformation gimmick of this component was speculated endlessly by fans before the actual model was shown. Quite a lot of steps involved for such a small component, not to mention the different materials used, plus the details of its design and molding, so it's really quite amazing actually. ^^
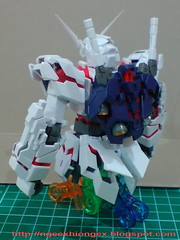
The completed upper body of the Destroy mode:

[Leg]
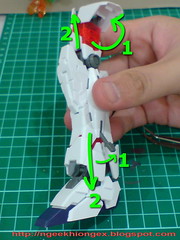

Part 1: Overall length
* Lift the thigh armor and pull the thigh upwards
* Lift the tab near the ankle and pull the leg downwards
* Secure the thigh armor and tab for the leg to their new locations after the extension of length.

Part 2: Knee
* Pull the knee armor downwards at its base, rotate the various parts on the knee as shown.
* Lift up the armor behind the leg and pull it downwards, this would spring the Psycho Frame inside the knee outwards, but not completely.
* Detach the transformed knee armors and pull out the Psycho Frame more.
* Reattach the knee armors back onto its base, with a tab secured onto the Psycho Frame.


Part 3: Shoe
* Flip down the shoe, move the top armor of the shoe upwards until it aligns with the armor of the leg.
* Rotate the ankle guard downwards, then the other armor on the side of the shoe upwards until it forms a pair of protruding pieces on the side of the shoe.
* Flip out the heel and front part of the shoe, until it becomes like a high heel XD
Definitely the components with the most number of parts to be transformed. Notice that I didn't say it's the hardest though, because it's not. Troublesome it may be for certain parts, but definitely not the hardest.
Some difficulties I faced for this part:
- Detaching all the knee armor parts to pull out the Psycho Frame isn't as according to the manual actually. The top part of the armor remains untouched as instructed, but I find it to be in the way for the transformation, so I detach it for my own convenience.
- I never really get the tab of the knee armor to be secured onto the Psycho Frame actually, as the later would always retract into the leg when I try to do so. As a result, the tab is just barely attached to the intended location all this while. ^^;
- Be careful when you're rotating the ankle guard downwards. Both pieces of the armors are connected via a joint located inside the frame of the leg, and it's quite strong. So by just pulling one piece of the armor downwards won't really move it. The armor would be detached instead. So, rotate that part by pulling the armors on either sides of the feet at the same time is more effective.
The completed legs:

[Shield]

* Pull the lower part of the shield downwards, then the Psycho Frame bars and done. ^^
Images and a bit of discussion on the Destroy mode in the next review.


9 comments:
For my Unicorn I find it hard to keep it from falling (possibly the joint between leg and shoe). Does it happen to you?
In a way, it seems the transformation is easier and harder than I thought.
Easier because the upper body didn't really need much transformation as expected. Harder because the knee Psychoframe doesn't move as in manual as you said, and also a lot of parts that don't really transform as easily.
This makes me wonder when I finally get to start on my Unicorn, would I need to use decals too because the transformation may scratch some off.
L : the same thing happen to me~ the ankle is too loose and it keep falling down with its heavy body~.. The ankle joint is special in this MG..Design flaw maybe~
I had the same problem with the ankles. That's why I bought a stand to display it on.
For the loose ankle problem, try spraying the internal frame with top coat or a grey finish. This would tighten a bit those areas. Another trick is to use Danny Choo's method...try googling it. I think he mentioned using super glue on the surface of the ball joints and the connecting pegs, let it dry and reassemble it.
Dear anoynomous, yar that spray joint think work for mostly all MG but not this one as i mention the joint are unique... i cant take them apart after assembly the ankle joint, thus i cant paint or apply some glue on it... (~_~) sob sob..
@Kok Chee Kang
Anyway you can try to pry open the parts carefully with a blade. I have sucessfully dismantled some of almost my completed kits or parts that way because i was careless, missing out a part or placing some internal parts the opposite direction. Pry evenly from all sides slowly and you will not break any parts. Even it is MG should be easy to spot the seam line origin (if you have sanded the parts and make the seam lines invisible.
Thanks for pointing out that fact. Guess i'll check out the manual of this kit first online and see the steps of assembly for the feet so that i can pinpoint the joint the part i need to spray in clear coat or lacquer. ^^;
The things on the shoulders are vulcans aren't they? As opposed to targeting sensors.
When I build my kits, I usually cut 50% of all connecting nubs, so that if I need to take it apart, it can be easily pulled apart, and once I finalize everything, then I just lightly glue them together.
Post a Comment